Implants are a much requested alternative to traditional bridges and partials in the dental practice. As implants become more sophisticated and adaptable to individual dental anatomy, dentists have greater opportunities for serving a wider patient base. Many technologies contribute to this popularity. The American Academy of Implant Dentistry (AAID) notes that “advanced, highly precise computer-guided dental implant surgery has made implant procedures faster, highly predicable and long-lasting with a success rate of 97 percent.” For my practice, CBCT (i-CAT™) and surgical guides make the process even more predictable.
Case study
When a member of my front office staff, Yari, confided in me that she had a toothache, I took a bitewing radiograph (DEXIS™ Platinum) and discovered that she had deep distal decay on tooth #20. Intraoral examination revealed a fracture beyond the cervical extent of the tooth. The tooth was non-restorable, so she was facing extraction and had several choices about how to replace that tooth. We discussed the possibility of a removable partial denture, a fixed bridge, or an implant.
Since she worked in the office each day, she said that after hearing my discussions with patients about cutting down healthy teeth and making a three-tooth problem instead of a one-tooth problem with conventional bridges, she wanted to have an implant.
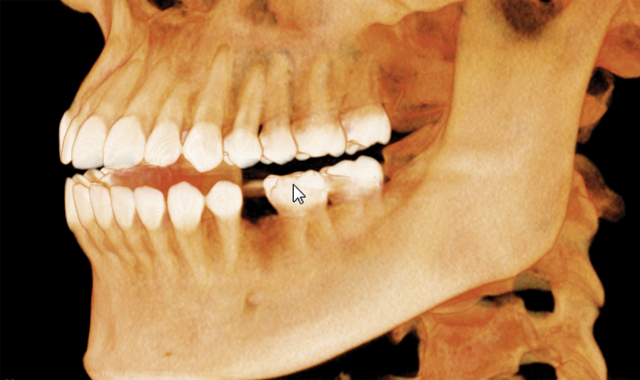
To start the process, we took an i-CAT CBCT at 16cm x 11cm as a 0.25 voxel size .I chose a full field of view size because Yari had some dental issues on the lower right-hand side to check as well, so I needed to have additional information on that area.
I extracted the tooth and used autogenous platelet-rich fibrin (PRF) and bone graft to preserve the space. After the extraction, I allowed healing time . Approximately four months later, we placed the implant.
I started with the capture of a post-extraction i-CAT CBCT scan . focusing in on the area of interest. I reviewed the implant site carefully and also used the Hounsfield tool in Tx STUDIO to assess the density of the area, which was 662 HU
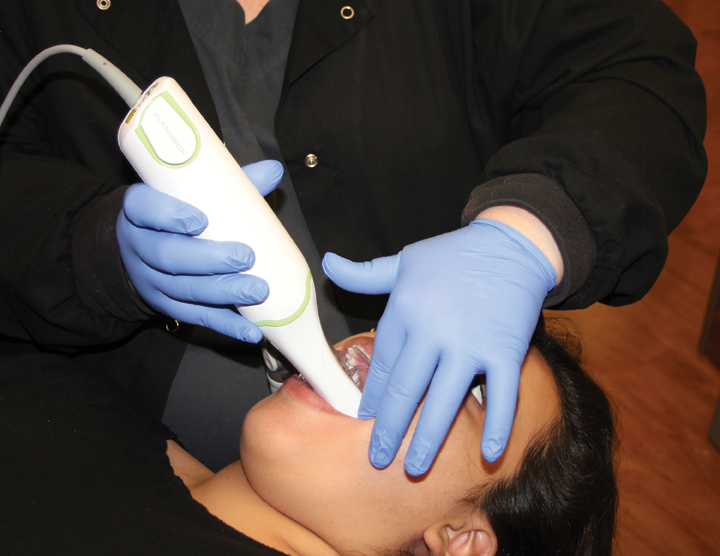
Then, I captured an STL scan using PlanScan (E4D), an open source scanner that produces a vector file composed of thousands of tiny triangles that map out the 3D shape of the scanned area. Because i-CAT is also an open source, I am able to use both of these scans together in many third-party planning software programs. For this case, I used BlueSky Plan® to virtually and precisely place the implant . I decided on the use of an OCO Biomedical 4 mm x 12 mm TSI implant with the guided implant kit.
When I finished my planning, I packaged up the scan files and plan and sent them to Digi3Dworks for the fabrication of the surgical guide. The CBCT and STL information create very accurate data from which the surgical guide could be printed by the lab. I had the surgical guide back in my office in a week.
When the guide arrived, Yari was working in the office, so between her filing insurance claims for patients and checking in patients, she became my “next” appointment.During the implant placement, I captured several intraoral radiographs to verify the placement of the implant.Using the guide offered precision placement. I placed the implant in 15 minutes, and she went back to work. To restore, I covered the screw hole with Grandio A2 (VOCO); a screw-retained crown (ProEsthetic Lab) was placed .
While I use many implant-related technologies and products, my implant planning begins with an i-CAT CBCT. It offers a detailed perspective of the dental anatomy before placing implants such as location of the nerve and the condition of the crestal bone. On the 3D scan, I can see vital bone information through the volume and its slices; make sure I have 2 mm between the nerve and the implant and 2 mm between the roots and the implant; measure the space the tooth is going to occupy; and choose an implant that is appropriate for that space so that I can achieve a good emergence profile. And, better yet, I can use the scan information to take advantage of CAD/CAM technologies for more exact placement. With CBCT, like Christopher Columbus, my world is not flat anymore — I have a well-rounded 3D view that helps me to hone my technique for a quick, efficient and precise implant placement experience.